WPLI Resource Mapping Tool v1.0
Help Documentation
Table of Contents
Video Tutorials
The videos below demonstrate how to use the Wyoming Public Land Initiative (WPLI) Resource Mapping Tool.
First time users of the application are encouraged to watch all the tutorial videos in sequential order.
Each video is approximately two minutes in length.
Tutorial 1: Application Overview
Tutorial 2: Map Navigation and AOIs
Tutorial 3: Table-of-Contents and Basemaps
Tutorial 4: Draw and Annotate
Tutorial 5: Save, Share, Print
Application Overview
The Wyoming Public Land Initiative (WPLI) Resource Mapping Tool is a powerful but simple tool for displaying and exploring geospatial
data. Among the features this application offers are the capability to overlay multiple "layers" of data on a basemap,
view attribute information associated with features in those layers, explore the map by zooming and panning, and save or share
user-designed maps as a PDF or URL. The various tools and features of this application are explained in this help document.
← Layers/Table of Contents Panel
← Zoom
← Home
Basemap Panel →
Draw Tools Panel →
← Save/Share Buttons
Find AOI Tool
← Scale Bar
← Map →
 Figure 1.
 The WPLI Resource Mapping Tool user interface with key features labeled in red.
Map Navigation
Zoom In/Out
`Zooming in` is equivalent to decreasing the scale of the map -- you can see less of
the overall map, but the region in your view will be "closer," i.e. will have more
detail. `Zooming out` is equivalent to increasing the scale of the map -- you can see
more of the overall map, but the region in your view will have less detail. This is an
important concept in map-based applications.
There are five basic ways to change the scale of the map by zooming in and out:
-
Zoom Buttons - At the top-left corner of the map, you will
find plus (+) and minus (-) buttons (see graphic below). Click the plus button to zoom in,
(i.e., decrease map scale). Click the minus button to zoom out (i.e.increase
the map scale).
 Zoom In
 Zoom Out
-
Double-click - Move your mouse over the map and double-click
anywhere to zoom in at that point.
-
Region Select - Hold the shift key while clicking-and-dragging on the map (with the
left mouse button). A highlighted region will appear on the map as you drag the mouse.
Release the left mouse button at any time to zoom in to the defined region. Pressing
and holding the control ("Ctrl") and shift keys at the same time will allow you
to click-and-drag to zoom back out.
-
Mousewheel - If your mouse is equipped with a mousewheel, you may rotate the mousewheel
to zoom in and out. Note that the application window must be the "active" window
for this to work (similar to any other computer application). If you are unable to zoom in and out using the mousewheel,
simply single-click anywhere in the application to "activate" it.
-
Keyboard - The plus-equals ( + / = ) and minus-underscore ( - / _ ) keys also
allow you to respectively zoom in and out. Note that the application window must be "active" for this to work.
Pan
Panning allows you to move around the map laterally and vertically. There are two
basic ways to pan the map:
-
Click-and-Drag - Simply left-click on the map with your mouse and drag to pan.
Release the mouse button to stop panning.
-
Keyboard - The arrow (← , ↑ , →, ↓) keys on your
keyboard can also be used to pan the map. Press and hold an arrow key to
pan continuously. Note that the application window must be "active" for this to work.
The "Home" button allows you to return to the map's default extent (i.e. resetting
the zoom and position of the map).
 Home Button
The Search Bar / Find AOI
In this application, a search bar is available to quickly locate and zoom to a number of important regions.
Important or user-defined regions are often referred to as "Areas of Interest" (or AOIs). To use
the search bar to locate an AOI, first click the top drop-down menu field ("Select category...") and select the areal category
you wish to search by. After selecting a category, click on the second drop down menu field ("Search by name...") to
select a specific feature to locate. You must choose a category before searching by name.
Note that you can type text into these drop-down menu fields. The menu will automatically complete your
input from the available options as you type. Typing a partial name is also possible. For example,
typing "canyon" would select all entries containing that string of characters (e.g., "Roger Canyon", "Canyons of Laramie", etc.).
Working with Layers
About Layers
A key component of this application is the ability to toggle various
data-layers on and off. Layers contain data that are represented on the map as features. For example, a
layer may show the locations of coal power plants, or the different types of vegetative ground cover for a region.
Layers are "drawn" (or represented) on the map as points, lines, polygons, or symbols.
A legend is integrated into the Table-of-Contents (TOC) to elucidate the map symbology.
The Basemap
The basemap is the default background (or "bottom") layer that is always turned on. There are several
basemaps to choose from, and these are typically simple,
and not accompanied by a legend. Data layers are overlaid on
the basemap. Note that only one basemap may be displayed at any time.
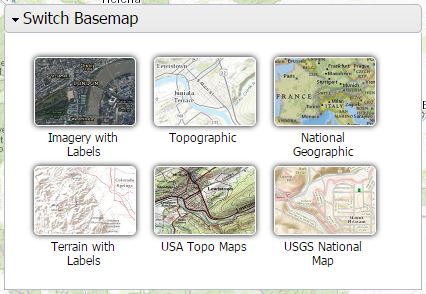
When you first load the WPLI Resource Mapping Tool, the default basemap will be automatically be shown in the map. To display
a different basemap, simply click the
"Switch Basemap" button located in the top-right corner of the map. The panel shown in the graphic above will
open with a variety of basemaps to choose from. Click one of these to change the current basemap.
Note that this will have NO effect on the data layers or settings you are currently using, so it is
"safe" to change basemaps at any time.
Turning Layers ON and OFF
To turn on a data layer, simply click the checkbox next to the layer's name, or click
on the layer name itself. The map will automatically update to display the selected layer.
Some layers will not be available at all display scales. When this happens, the layer name will change
color and the checkbox will be "grayed" out -- in this case, the layer represents data that can
only be viewed at specific zoom levels. Simply zoom in or out until the layer becomes
available, then click on it in the TOC. Note that to turn this type of layer off,
you must also be at a zoom level where the layer is visible.
To turn off a data layer, you can follow the same procedure outlined above. Once you have
clicked on the layer checkbox or name, the map will automatically update to remove the selected layer.
Optionally, you may click the "Clear Layers" button. This will turn OFF all the layers,
including any layers that are ON but not visible at the current zoom level. Note that
this action does not apply to the basemap, and cannot be undone.
Exploring the Table of Contents (TOC)
The TOC represents all data layers available to the user. These layers are
grouped by category (or theme). Each category may have sub-categories containing their
own data layers. Figure 2 (below)
is an example of a category ("Land Divisions") and its data layers: "National Parks," "Cattle Pastures," and "Vegetation Type".

Figure 2. Anexample of a TOC category and its data layers.
To collapse or expand the contents of a category, simply click on the category name. For example, in Figure 2,
clicking on "Land Divisions" would collapse this category's contents, hiding the three data layers within the
TOC. Note that this does not turn off these layers on the map -- it simply hides them in the TOC.
To turn on or off ALL the active layers within a category (and any sub-sections within that category), simply
click on the checkbox next to the desired category. Note that individual layers retain their state during
this operation -- i.e., if all the layers within a category are unchecked, checking the category will not
actually "turn on" those layers. In other words, a layer must already be "ON" for this action to take effect.
When this application loads, the default is such that all layers are OFF, and all sections are ON and COLLAPSED.
Again, note that simply collapsing a category in the TOC has no effect on how the layers are displayed on the map.
Using the Legend
To the left of each layer name in the TOC, you will find a small icon. This icon corresponds to the
symbology (i.e., point, line, or polygon) used to draw the layer on the map. A collection of such symbols
and their meanings is referred to as a "key" or
"legend." Referring to the example in Figure 2 (above), you can see that the
"National Parks" layer will be represented by a polygon with a green outline. The "Cattle Pastures" layer
is a polgyon with a dark-red outline and a light-red fill.
A layer that represents more complex data may require multiple symbols. Notice the small box with a "+" symbol in it
next to the "Vegetation Type" layer in Figure 2. Clicking on the "+" symbol will expand
that data layer's legend, revealing all the symbols used in representing that data layer on the basemap.
Once expanded, the "+" symbols becomes a "-" symbol that may be clicked on to collapse the legend.
Each layer has metadata ascribed to it. Metadata contains useful information about the type of data contained
in the layer (e.g. where the data came from, when it was generated, or the entity in stewarding
the data). To view the metadata for a layer, click on the
small circle labeled "i" next to the on/off checkbox for the layer. This icon is visible in Figure 2 (above) at the
far-left of each layer. Once the icon is clicked, a popup will appear with the layer's pertinent meta-data, along with any
available links to additional information about that layer.
Inspect Features
Every layer on the map is comprised of one or more individual features. You may see features
represented as points, lines, polygons, or symbols. The capability to inspect a map feature
allows you to highlight it and view any data associated
with that feature. To inspect a feature, simply click on its representation on the map. A popup will appear,
and you will see the feature highlighted on the map. Multiple features will be
selected if they are overlapping or adjacent to one another at the point where you click.
Note that you must first turn on at least one layer before you can see OR inspect
any features.
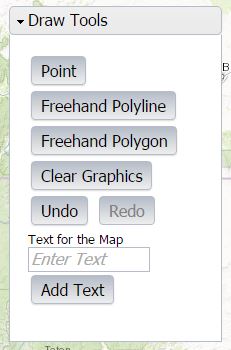
The draw tools panel is located below the "Select Basemaps" button in the top-right corner of the map.
Click on the button labeled "Draw Tools" to open the draw tools panel. You may then choose from
a number of tools that can be used to mark-up and annotate the map. Any points, lines, polygons, or text you draw on the map
will be shown in your PDF map when you "Print to PDF."
Points, Lines, and Polygons
Points are simple point-markers that represent or emphasize a single x-y (latitude/longitude) coordinate on
the map. To draw points on the map, first click on the "Point" button in the "Draw Tools"
panel. Then click on the map at the point where you wish to place the marker.
Polylines are lines that may be drawn "freehand" to represent curvilinear shapes. To use the line tool,
click the "Freehand Polyline" button in the "Draw Tools" panel. Then, click on the
map at the point where you wish to begin drawing. With your mouse-button still depressed, move the cursor to draw the
desired shape. Release your mouse-button to end the line and complete the drawing action.
Polygons are shapes composed of multiple, coterminous, line segments that form
a solid, two-dimensional, bounded region. Polygons are similar to lines, except that they
will always `close` to form a solid shape. To draw a polygon, click "Freehand Polygon" in
the "Draw Tools" panel. Then, click on the map at the point where you wish to begin drawing. With your mouse-button
still depressed, move the cursor to draw the desired shape. Release your mouse-button to
complete the drawing action. A line segment will automatically be added joining the start- and
end-points to `close` the polygon.
Repeat the respective procedures outlined above to create multiple points, lines, and polygons on your map.
Draw Text (Annotate)
Sometimes, it is useful to add labels or other notes to the map using text. This is commonly referred
to as "annotating" the map. To annotate the map with text, first open the "Draw Tools" panel, and
then type the desired text into the box labeled "Text for the Map." Click the "Add Text" button underneath
the text you have entered. Then, click anywhere on the map to place your text at that point. Similar to the other draw tools,
annotations will "Print to PDF."
Undo, Redo, Clear
The "Undo" and "Redo" buttons allow us to step backwards or forwards through our actions, in order to undo or redo
whatever modifications you have just made.
Undo allows you to remove the last symbol you placed on the map with "Draw Tools."
To use the undo feature, simply open the "Draw Tools" panel and click the "Undo" button.
You may undo multiple steps by clicking the "Undo" button multiple times.
To reverse this action (or 'undo the undo'), it is possible to use Redo. The "Redo" button is located adjacent
to the "Undo" button inside the "Draw Tools" panel. Once you have undone an action using the "Undo" button,
you may then use the "Redo" button. Similar to the "Undo" button, you may to "Redo" multiple steps by continuing
to click the button.
Clear enables you to remove all user-generated points, lines, polygons, and annotations on the map at once.
The clear operation also clears the AOI defined by the "Find Area of Interest" tool.
To clear all user-generated graphics and annotations, click the "Clear" button inside the "Draw Tools" panel.
This operation is analogous to the "Clear Layers" button in the TOC panel, except that it will only clear user-generated
graphics, annotations, and the AOI.
Note that if you have not drawn anything on the map using the "Draw Tools," there will be nothing to undo, redo, or clear.
Saving and Sharing Your Current Map
Saving your map is a useful way to share your map or store it for later use. Once you have created a map of interest,
you will have two basic options to save and share it.
Saving (or 'printing') as a PDF provides you with a digital file that can be viewed, physically printed, emailed, and stored
on any digital storage medium (such as your computer hard-drive). Generating a Hyperlink creates a web address (or URL) that
can be easily bookmarked in your browser, or copied and pasted. Note that graphics added using the draw tools are not saved
via Hyperlink.
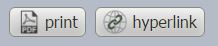
Save Map as PDF
This tool allows you to easily save or print your map as an Adobe PDF file. First, click on the
"Print" button. A message will appear notifying you know that your PDF file is being created. When your PDF
is ready, a new window will open as a popup (note: if you have popups disabled for this website, your popup may be blocked.
Most browsers will alert you of blocked popups in the top-right of the browser window).
After the popup is created, you may print your document or save it to the medium of your choice (computer hard-drive, USB drive, cloud storage, etc.).
Note that in the popup, you are only viewing the PDF. You must choose to print or save it via the options provided by your
browser. In most cases, simply hovering over the PDF with your mouse will bring up a menu of these options. For further help with
these options, consult your browser's help documentation.
Generate Map Hyperlink
A convenient way to rapidly share your map may be to generate a hyperlink. This "hyperlink" is analogous to
the text you type into the top of your browser (i.e., a URL). To generate a hyperlink for your map, click on the
"hyperlink" button. A popup containing your link will appear. Clicking the blue hyperlink will open your generated URL
in a new browser window. This link can be bookmarked for later use, or copied-and-pasted
in an email to share your map with a colleague. The URL is also displayed as a plain text in the popup.
Required Technology
Hardware
The WPLI Resource Mapping Tool requires a PC, laptop, or tablet, with a keyboard and point-and-click interface, such as a mouse or touch-pad.
The application is NOT designed for use with: mobile devices, smart-phones, or purely "touch" based devices.
Software
This application requires a modern web browser. Below is a list of acceptable browsers with download links.
Back to Top